5 Website Accessibility Tips for Wedding Vendors
- Jessica Levey
- Jun 8, 2025
- 9 min read
Updated: Aug 28, 2025
Planning a disability-friendly wedding starts with an accessible website
I’ve never met a wedding vendor who didn’t want to reach as many potential clients as possible. But if your website isn’t accessible to people with disabilities, you’re missing out on a lot of potential business (and a lot of love!). Luckily, there are a few simple ways to make your website more accessible without much effort.
Before we get to “how to make your website accessible,” let’s take a quick look at the “what” and “why” of website accessibility. Knowing these basics can help you become a more inclusive wedding vendor, avoid potential lawsuits (yep, that’s a real risk), and attract more clients.
As an added bonus, accessible websites tend to have better SEO too – helping your business appear in more online searches and increasing your marketing reach. Everyone wins when websites are more accessible!
So, what does it mean for a website to be “accessible”? And how do you accomplish this? Let’s take a look!
First, a quick introduction to web accessibility for small businesses and wedding vendors
What does “Web Accessibility” mean?
Briefly, “website accessibility” or “web accessibility” is a broad term that means a website can be easily used by disabled people with different needs. This includes people who use assistive technologies like screen readers, audio captioning, or keyboard navigation to enjoy online content. Disabled people have a protected right to access your website and other public online spaces under the Americans With Disabilities Act (ADA).
Visualize it: Just like a physical storefront must be accessible to a wheelchair user, an online business must be accessible to someone who uses a screen-reader or audio captions to visit that digital location. All online businesses that are open to the public are legally required to accommodate disabled visitors, just like physical businesses are.
Web accessibility is a huge topic. You’ve probably heard of “alt text” for images, which describe what’s happening in a picture for users with vision impairments. Or “closed captioning,” which provides a written transcript for the audio in videos, used by Deaf and hard-of-hearing users. Or maybe you’ve formatted your blog page with “h1”, “h2”, and “h3” headings, to organize your content in a logical way. All of these are examples of things that make websites more “accessible,” but they just scratch the surface! There are also helpful guidelines on how to format a customer contact form, the size and color of the fonts you choose, and much more.
Like I said, it’s a huge topic! For a detailed look, check out: Introduction to Web Accessibility, provided by WC3 WAI (Web Accessibility Initiative)
Wait, back up, websites are covered by the ADA?
If you’re reading this and wondering “Does my website have to be ADA compliant?” The short answer is: Yes.
The ADA requires all ‘public accommodations’ in the United States to provide equal enjoyment of their services to people with disabilities, including small businesses and sole proprietorships. If your wedding business and website are open to the public, you are a ‘public accommodation.’ Public access to your website, like any physical location of your business, is protected under Title III of the ADA.
Read more about it here: Guidance on Web Accessibility and the ADA from ada.gov
If this comes as a surprise, you’re definitely not alone! An estimated 94.8% of home pages don’t meet the international Web Content Accessibility Guidelines (or WCAG for short), which are the main standards for web accessibility. This means that almost 95% of online spaces aren’t fully accessible to disabled users. That’s a staggering number of websites and services that disabled people can’t fully enjoy!
But don’t panic:
Luckily, there are simple things you can do right now to make your website more accessible to disabled visitors. There are also lots of free resources available to help you continue improving your site over time – including free WAVE Web Accessibility Evaluation Tools from WebAIM.
Next, 5 tips to make your website more disability-friendly, with examples
Now that you know the basics, it’s time to get started! Below are 5 ways to make your wedding business website more disability-friendly and accessible to everyone.
Note: Keep in mind that these improvements won’t make your website “WCAG conformant” or completely ADA compliant. They’re just a good place to start. For a detailed list of guidelines and improvements you can make, check out: Requirements for Web Content Accessibility Guidelines 2.2 (W3C Editor's Draft 05 June 2025)
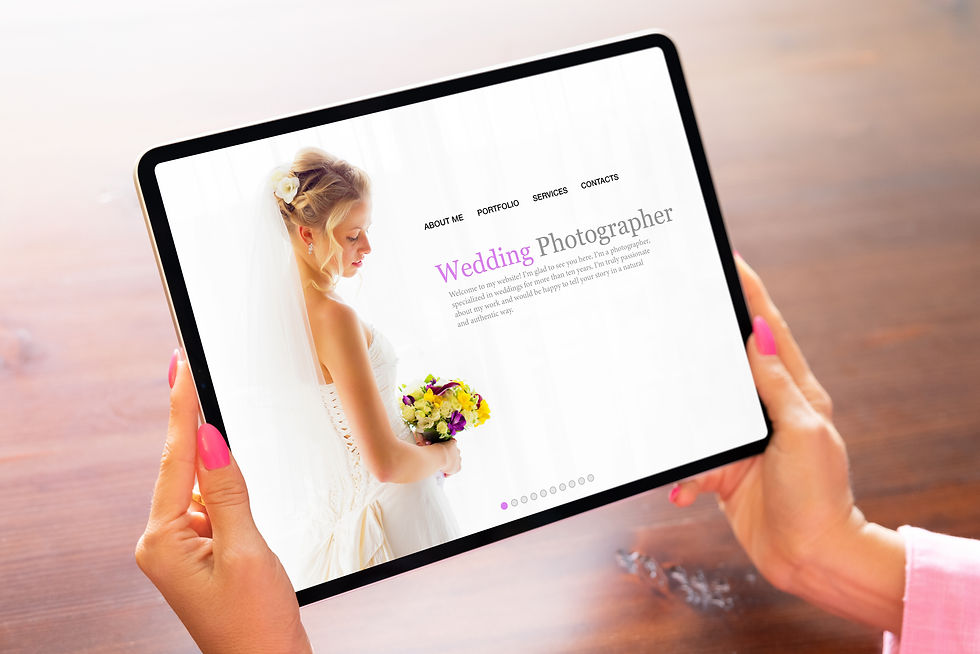
1. Add Alt Text, Captions, and Context to Images
One simple way to improve your website’s accessibility is to ensure that all visual content is perceivable to visitors who are blind or have low vision. This includes adding meaningful alt text for images and icons, so that assistive technologies like screen readers can communicate the content through audio (spoken descriptions). It’s also important to include descriptive captions for each photo or graphic, and to make sure that the surrounding text provides helpful context for your images. Avoid redundant information though – your captions shouldn’t repeat your alt text description.
Add meaningful alt text to images and icons. Alt text descriptions should be kept short, around 125 characters. Short descriptions are easier for people to understand and remember.
Add descriptive captions to your images to bring visual content to life for all users.
Ensure that the paragraphs and other text that surrounds your images add context. This helps limit confusion about the purpose of images within blog posts, wedding package descriptions, or your ‘about me’ page.
Need a real-world example of how to add alt text, captions, and context?
Consider the stock photo taken by Asad Photo Maldives below.
Alt text example: Upscale wedding banquet table arranged with place settings and luxurious pink flowers, twinkle lights and lanterns in the distance.
Context in the surrounding paragraphs: The surrounding paragraphs should add more details about this wedding florist's seasonal bloom packages and table arrangements, their flower options, or a list of their partnering flower farms.

2. Make Video and Audio Content Accessible With Transcripts, Captions, and Contrast
Ensure that any audio or video content on your website is perceivable to all visitors by providing complete written transcripts that include dialogue, sound effects, and relevant background music descriptions. This allows users who are Deaf, hard of hearing, or who prefer to read (rather than listen) to enjoy your content fully.
Learn how to create an accessible transcript PDF for your video here: “Adding Transcripts to YouTube Videos” by Rob Power (Power Learning Solutions)
Closed captions are synchronized text displayed during videos that reflect spoken dialogue and audio cues. Captions allow users to follow along in real time without needing to hear the audio. Some media players and platforms provide captions for you – just turn the features on in your settings and you’re good to go. (You might need to edit the captions for accuracy.)
Make your video content even more accessible by turning off auto-play and making sure you’re visible when speaking (to help with lip-reading). Make sure your media player offers user controls (a WCAG requirement), and film your video in good lighting with high resolution (for low-vision users).
Provide complete written transcripts with dialogue, sound effects, and music descriptions
Add closed captioning for real-time text versions of audio information
Turn off auto-play to limit disruptions
Provide clear controls for playing, pausing, and rewinding your video content
Ensure the video is well lit, has sufficient contrast and resolution, and keeps the speaker in frame (when possible)
These tips are also great for any social media videos you create!
Need a real-world example of how to include a transcript, closed captions, clear media controls and visual clarity in your video? Here’s a quick video summarizing this section that includes each suggestion.
3. Make Your Website Keyboard-Friendly
Next, make sure that each page on your website can be navigated using only keyboard controls. This is important because some visitors may not use a mouse or touchpad. As a bonus: When a website is properly set up for keyboard navigation, it’s often easier for screen readers to interpret and navigate too!
For a detailed explanation of keyboard navigation with examples of simple html codes, head here: How to Implement Keyboard Navigation in Your Web Application: A Guide to Web Accessibility
Unless you’re already familiar with how websites operate behind the scenes, it will take some time to get the hang of this one. Luckily, most web platforms – like WIX, Squarespace, or WordPress – already have some keyboard navigation features built into the background (or backend) coding.
Still, most of these platforms aren’t fully WCAG conformant. If you don’t have advanced tech skills, it might not be possible to address all issues. But you can still improve your site’s keyboard accessibility with a few small changes!
Make your site more keyboard-friendly by:
Enable a “Skip to Main Content” link so that visitors can bypass repetitive elements on your page (like the site menu and header content)
Use semantic headings (like Heading 1, Heading 2, etc.) to organize your written content in a clear hierarchy. This helps both keyboard users and screen readers
Include focus indicators that show which element is currently in focus; for example, a button that changes color when a user has navigated to it, or an entry field that outlines in blue
Avoid keyboard traps by ensuring all parts of your page can be entered and exited using the keyboard
Include a logical tab order; this ensures users can navigate through links, buttons, and forms in the order they visually appear on the page

4. Use Clear Language and Avoid Confusing Wedding Terms or Industry Jargon
Using clear language is a great way to make your wedding website more welcome to all couples and families. This means using short sentences, clear punctuation, and familiar words to describe things. And whenever possible, avoid (or clarify) technical terms, industry jargon, and slang.
If you’ve been in the wedding industry for a while, you know all the slang and lingo like the back of your hand. But most couples and family members don’t! This isn’t unique to disabled visitors – everyone benefits when you use clear language to communicate.
Here are a few examples for avoiding wedding industry jargon:
Say “Candle-lighting ritual” instead of “Unity Candle ceremony”
Clarify what you mean when you say elopement (as this word has multiple meanings); for example, you might say “3-4 guest elopement” or “a ceremony with just the couple, witnesses, and officiant”
Write out “Mother of the Bride” or “Father In-Law,”instead of using the acronyms “MOB” or “FIL” (etc)
Clarify the meaning of an “unplugged ceremony” as a phone-free and technology-free wedding ceremony
Write out “Food and Beverage Minimum” instead of “F&B Minimum”
Say “second photographer” instead of “second shooter”
And so on!
5. Organize Your Content Using Meaningful Headings
One super helpful way to make your website easier to navigate is to use clear, consistent headings. These are called semantic headings, and they help both sighted visitors and assistive technology, like screen readers, to understand the structure of your content.
Bonus: Clear headings also help visitors with ADHD, dyslexia, and cognitive and learning disabilities to easily use your website. By providing simple organization and structure, all users benefit.
Think of headings like a table of contents. They tell users where they are and what’s coming next. And they don’t just look organized, they guide screen readers through your written content. Without clear heading structure, your content might sound like one giant wall of text as it’s read, even if it looks fine visually.
Here’s how to use semantic headings:
Start with just one Heading 1 (or “h1”) — usually your page title
Use Heading 2s (“h2”) for major sections
Use Heading 3s (“h3”) or lower for sub-sections
Don’t just bold or enlarge text so that it looks like a heading; use your website platform’s built-in heading styles to assign headings
Adding clear headings doesn’t just help with accessibility, it’s also great for SEO. Search engines use your headings to understand your content better, which can help more couples find your site!
This list doesn't cover everything, but it's a great place to start!
Start today! Pick one of the tips above to implement this week, and bookmark the WAVE tool and WCAG resources linked above for future updates. Track your progress to see how inclusive and welcoming your site becomes! Not only can an accessible website make a difference for your business, it makes a big difference to the people and communities you work with -- and that's most important of all.
Disclaimer: I do my best to research and fact-check everything I share here, but I’m not a lawyer or legal expert. This blog is meant to share helpful information and personal insights, not to offer legal or professional advice. Always double-check with a qualified professional if you're unsure.


https://soicau247.com/ dạo này mình lướt thử vì thấy mọi người hay nhắc, vào chủ yếu xem bố cục chứ không ngồi “chốt số” gì. Ấn tượng đầu là trang chia phần khá mạch lạc, kiểu có khu kết quả và khu soi cầu/dự đoán tách ra nên kéo xuống không bị lạc. Mình thích mấy bảng lô tô đầu/đuôi trình bày theo cột nhìn gọn, liếc phát là hiểu, không bị chữ số dồn đống rối mắt. Với lại tiêu đề theo ngày tháng để khá rõ, nên lúc mình mở đúng mục “Xổ số Miền Bắc ngày 03/06/2026” là thấy ngay phần bảng đầu/đuôi lô tô nằm ngay dưới, nhìn rất dễ theo dõi.
kèo nhà cái 5 hôm bữa mình vô thử cho biết vì thấy bạn bè nhắc mấy bài soi kèo. Cảm giác đầu tiên là giao diện nhìn thoáng, kéo xuống cái là thấy các trận được chia theo từng khối rõ ràng nên không bị rối mắt. Mình có bấm đại vào một bài (hình như Napoli vs Torino) thì phần thông tin hiện ra gọn gàng, giờ đá với tên đội được làm nổi nên lướt nhanh vẫn nắm được. Mình không ngồi đọc phân tích kỹ, chủ yếu xem cách họ sắp xếp nội dung thôi, thấy chữ không bị dồn và khoảng cách dòng ổn. Menu cũng để ngay chỗ dễ thấy nên chuyển qua lại…
fly88 mình cũng chỉ ghé thử vì thấy bạn bè nhắc hoài, kiểu tò mò xem trang trông ra sao chứ chưa có ý “tham gia” gì. Vào cái là thấy giao diện khá nhẹ mắt, các mục được chia nhóm rõ nên kéo xuống một đoạn là nắm được luồng nội dung. Mình để ý họ có mấy khối giải đáp nhanh, đọc lướt là thấy có nhắc giấy phép kiểu PAGCOR với Isle of Man GSC nên cũng yên tâm hơn chút về mặt thông tin. Với lại phần nói về bảo mật có đề cập SSL 256-bit, trình bày gọn gàng chứ không dài dòng. Nói chung mình thích cách họ để tiêu đề to, chia block…